
Managing Metadata Fields in Site Manager
How to add or remove custom metadata fields, create new content definitions, and get new fields onto the metadata form.
Managing Metadata Fields in Site Manager
The fields on your custom metadata form are not configured in the form itself. They come from content definitions in the Site Manager of the Admin Console. This page covers:
- Adding or removing fields on the custom asset metadata form
- Creating a new top-level content definition, such as a lookup list that feeds a dropdown
- What each setting and tab on the content definition editor means
- How changes appear in the legacy Admin application and in the portals
- Setting security so the right users can see and edit the data
New to content definitions? Read the Content Definitions Overview first for the basics: fields, property names, display fields and relationships.
The Asset Metadata Content Definition Controls the Form
In Site Manager, the content definition named Asset Metadata is the single source for the fields on the custom metadata form. To add a field to the form, add it to Asset Metadata. To remove a field from the form, remove it from Asset Metadata.
To add a field:
- Open the Admin Console and go to Site Manager.
- Open the Asset Metadata content definition.
- On the Field Definitions tab, click Add Field.
- Fill in the Field Properties dialog (described below) and click Save.
- Click Save at the top of the content definition.
To remove a field, click the red delete button next to it on the Field Definitions tab, then save the content definition.
Don't change a field's type after data has been entered. If you need a different type, create a new field with a new property name. See Important Warnings.
Field Properties
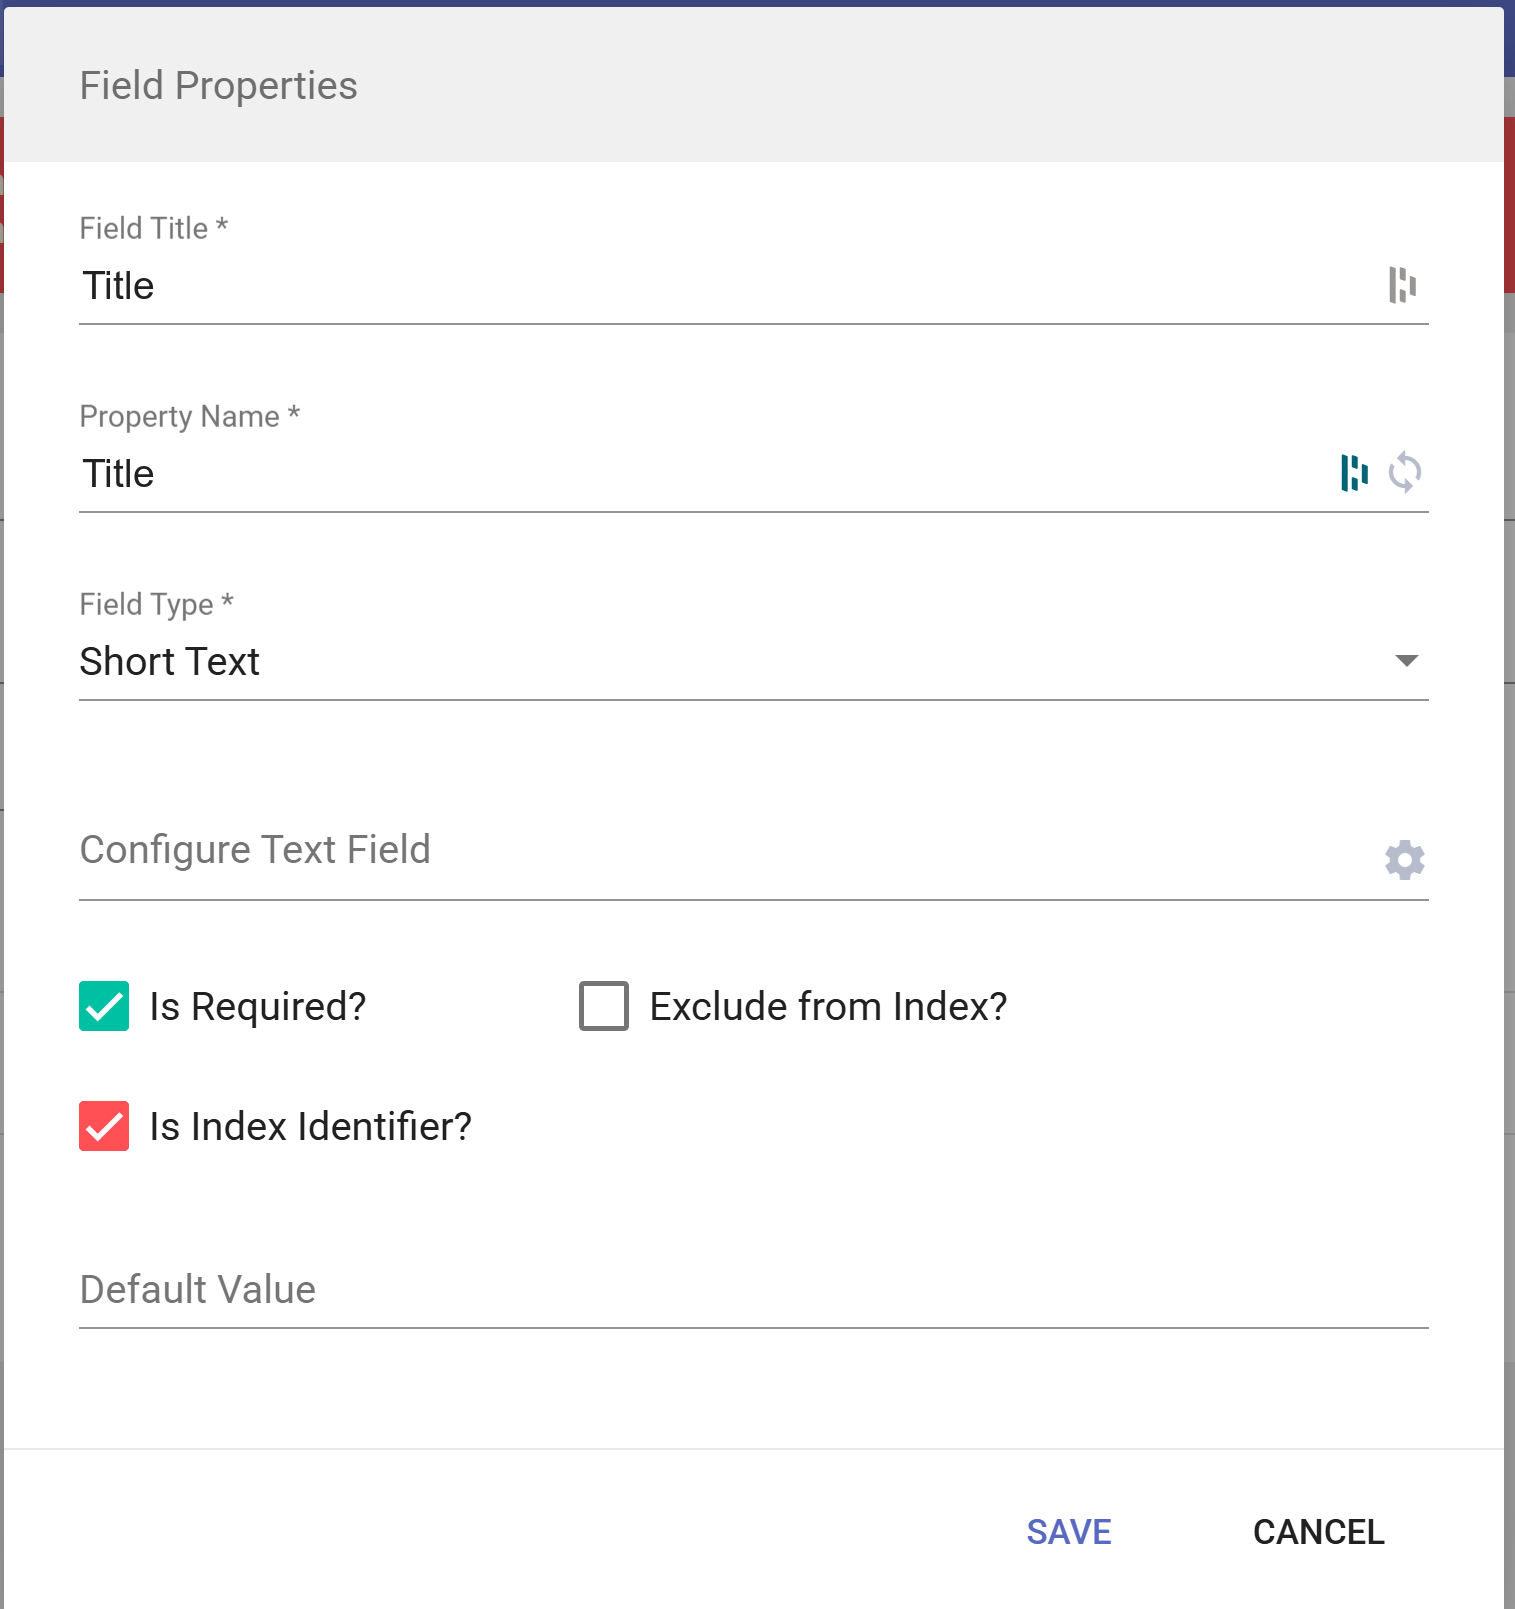
| Setting | What it does |
|---|---|
| Field Title | The label users see on the form. |
| Property Name | The key used to store the value, query it in search and read or write it through the API. It's generated from the title, but you can edit it. Choose carefully: it becomes part of your API contract. |
| Field Type | The kind of input: Short Text, Long Text, Date, Lookup Dropdown, Checkbox and so on. See Field Types. |
| Configure ... Field (gear icon) | Extra options for the selected field type. The label changes with the type. |
| Is Required? | Users can't save the record unless this field has a value. |
| Is Index Identifier? | Adds the field's value to the search index, so it can be returned in and filtered on in search queries. Check this for every field unless you have a specific reason to keep a field out of search. |
| Exclude from Index? | Always leave this unchecked. |
| Default Value | Optional value filled in on new records. |
Some names are reserved by the system, and a property name used on more than one content definition must have the same field type everywhere. See Content Definition Naming Restrictions before you choose a property name.
Creating a New Content Definition
Sometimes a field needs its own list of values, such as a dropdown of productions, venues or rights holders. For that, create a new top-level content definition. You can then point a Lookup Dropdown or Related Content Definition field on Asset Metadata at it.
In Site Manager, create a new content definition. Many settings on this screen belong to older features that are now deprecated. Use the values below.
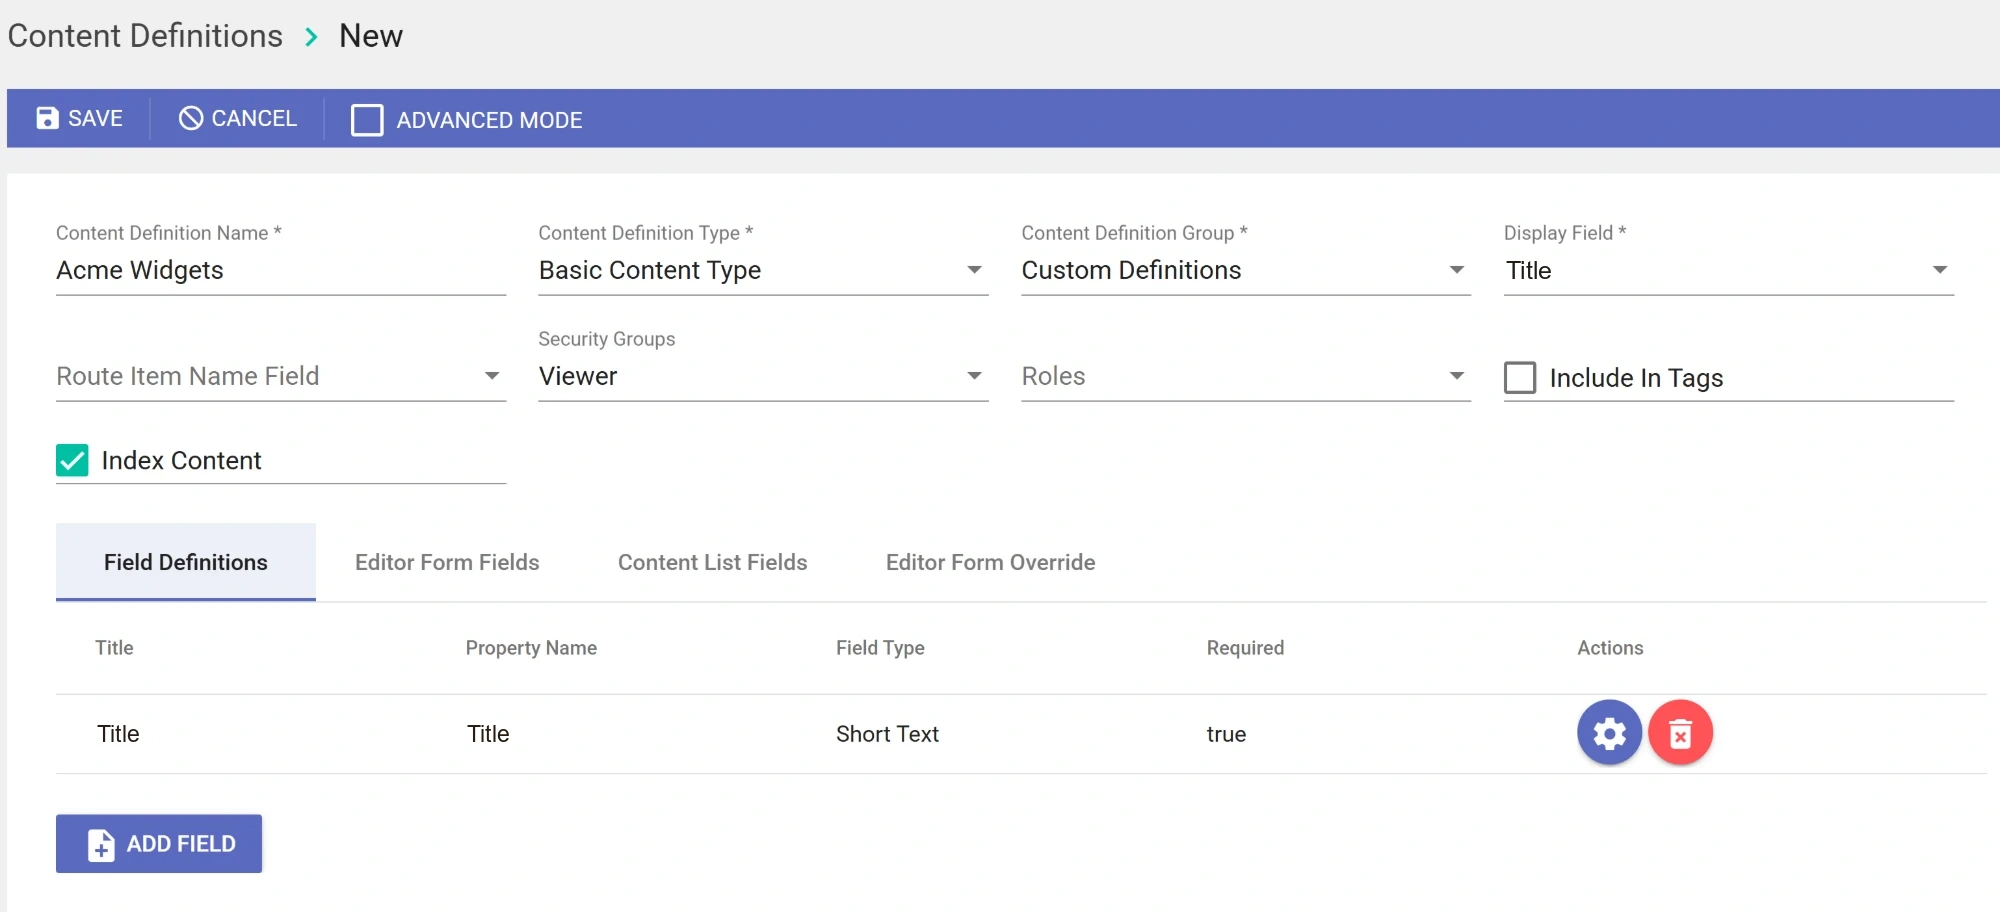
| Setting | What to enter |
|---|---|
| Content Definition Name | The name of the list, for example Acme Widgets. This is also the name that appears in the module selector. |
| Content Definition Type | Always Basic Content Type. |
| Content Definition Group | Always Custom Definitions. |
| Display Field | The field whose value is shown when a record appears in a dropdown. Always set this to the Title field. See The Title Field below. |
| Route Item Name Field | Always leave this blank. |
| Security Groups | Which security groups can see and work with this content definition. See Security. |
| Roles | Not used at this time. Leave it blank. |
| Include In Tags / Index Content | Leave these as shown in the screenshot unless Nomad Support tells you otherwise. |
The Title Field and Display Field
Every content definition needs a Title field, and that field must be its Display Field. The Title field is the label people see when they pick a record from a dropdown.
Why is the Display Field dropdown empty? The Display Field dropdown only lists Short Text fields that already exist on the content definition. On a new content definition there aren't any yet, so the list is empty. Add the Title field first, and it will appear as a choice.
To set it up:
- On the Field Definitions tab, click Add Field.
- Set Field Title to
Title, Property Name toTitleand Field Type to Short Text. - Check Is Required? and Is Index Identifier?, then click Save.
- Choose Title in the Display Field dropdown at the top of the page.
Then add the rest of the fields you need and save the content definition.
The Content Definition Tabs
| Tab | What it controls |
|---|---|
| Field Definitions | The fields on the content definition: add, edit or delete them. |
| Editor Form Fields | Which fields appear in the editor pop-up, and in what order. |
| Content List Fields | Which columns appear in the list view, and in what order. |
| Editor Form Override | Not used. You can always ignore this tab. |
Editor Form Fields
This tab sets the layout of the editor pop-up that opens when someone creates or edits a record.
- Order: arrange the fields in the order they should appear on the form, from top to bottom.
- Show or hide: select a field to show it on the form. Deselect it to hide it. A hidden field stays on the content definition, along with any data in it. It just isn't shown in the editor.
Content List Fields
This tab sets the list view, the table of records you see when you open the content definition from the module selector.
- Order: arrange the fields to set the left-to-right column order.
- Show or hide: select a field to show it as a column. Deselect it to hide the column. Keep the list view short, with Title plus the few fields people scan or sort by most.
Seeing Your Changes
Legacy Admin Application: Automatic
When you save a content definition, the legacy Admin application picks up the change on its own. Fields added to Asset Metadata appear on the asset's metadata editor without any extra setup.
When you create a new content definition, refresh the Admin page in your browser. The new content definition then appears as a choice in the module selector in the top left, where users can open its list view and add records.
If a change still doesn't appear after a refresh, choose Clear Server Cache from the top-right menu, then sign out and back in. See Custom Asset Metadata Configuration.
New Portal and Legacy Content Portal: Contact Nomad Support
Fields don't appear on the metadata form in the new portal or the legacy Content Portal on their own. Nomad Support has to add them to the form layout.
When your field is ready:
- Add and save the field in Site Manager as described above.
- Tell Nomad Support that the field is ready. Include the content definition, the field title and property name, and where you'd like it on the form, for example "in the Rights panel, after Territory."
- We'll add the field to the metadata form in the right place and let you know when it's live.
For background on how portal metadata panels are configured, see Custom Asset Metadata Configuration.
Security
Access to a content definition is set by its Security Groups. If a user isn't in one of the groups assigned to a content definition, they won't see it in the module selector and can't view or edit its records.
- Assign every security group whose users need to see or edit the data. A common pattern is a viewer-level group for read access plus your editor or admin groups for write access.
- For a lookup list used by a field on Asset Metadata, make sure everyone who edits asset metadata can at least read the list. Otherwise the dropdown on the metadata form will be empty for them.
- Roles are not used at this time and can be ignored.
For more on security groups and users, see Security and Users.
Related Topics
- Content Definitions Overview: fields, field types, property names, display fields and relationships
- Content Definition Naming Restrictions: reserved names and type-mismatch rules
- Custom Asset Metadata Configuration: entering metadata in the Admin Console and portal metadata panels
- Metadata Manifest Importing: bulk-loading metadata from sidecar files
- Security and Users: managing users and security groups
Updated 6 days ago