Custom Asset Metadata Configuration
With Nomad Media you can add custom defined asset metadata to your assets.
Out of the box install
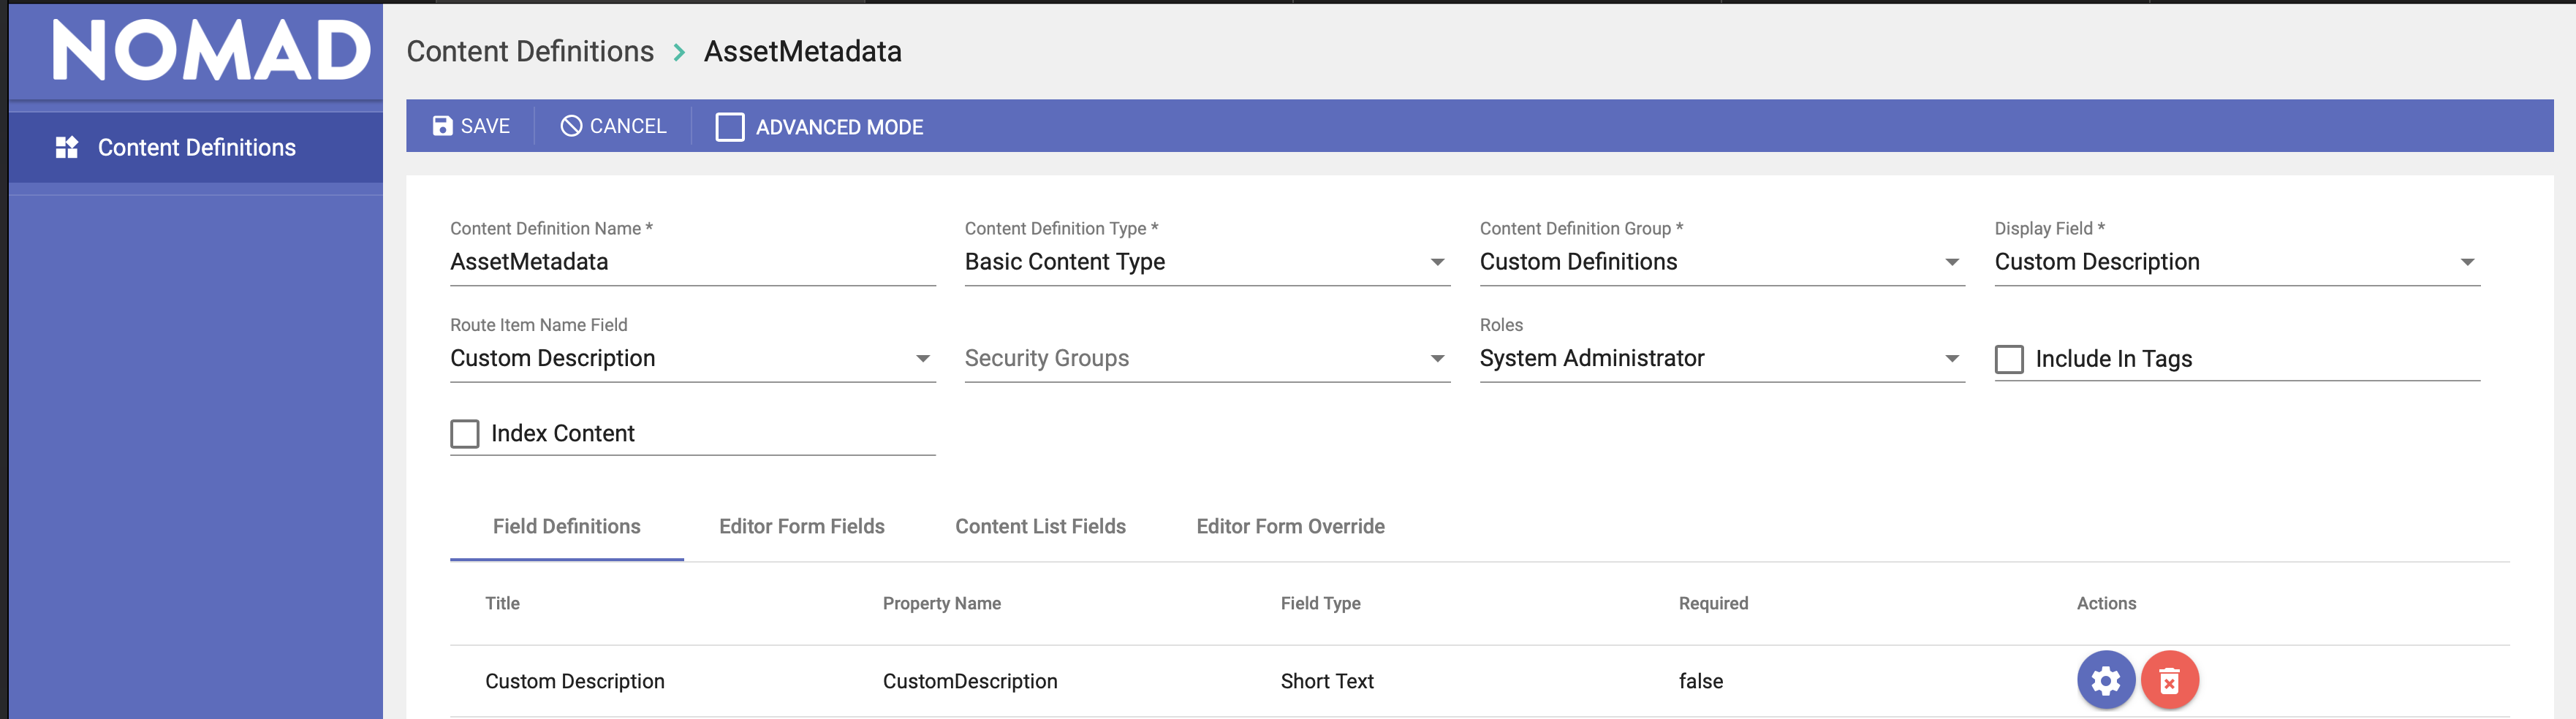
If you pull up your Site Manager from the Admin Console you will see a Asset Metadata content definition.


Without any configuration, the out of box Nomad Media installation will have this for the custom asset metadata configuration in your Site Manager.
Configurations
You are able to adjust this content definition to your needs. This is example of some of the options you have while configuring.

This is current list of content definition field types we currently support.
- Short Text
- Long Text
- Date
- Time
- Lookup Dropdown
- Asset Selector
- Lookup Multi-Select Chip View
- Checkbox
- Related Content Definition
- Number
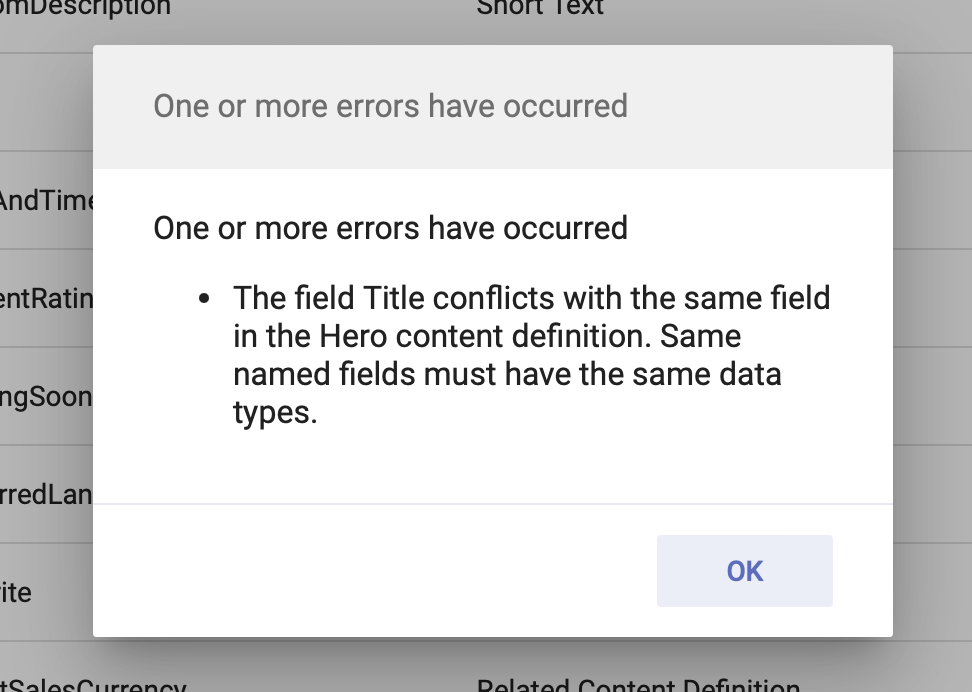
When saving your content definitions you may see an error message like this. This means you have one or more content definitions sharing the same property name but with different field types. You will have to either match the type or change your property name to a new unique name.
After successfully saving your asset metadata content definitions, we have one thing to do before we can confirm the changes. In the admin console from your top right menu, select Clear Server Cache and then log completely out of your browser and back in. This helps clear the server and your browser caches.

Entering Custom Asset Metadata in Admin Console
To add custom metadata to your assets you can use the admin console for this. Select the asset you want and under the properties panel to the right there is a metadata option.
You can add custom asset metadata to folders or files. Note: Folder inheritance is currently not supported at this time.
If you see this view under the metadata section, then there is no custom metadata assigned to the asset at this time.
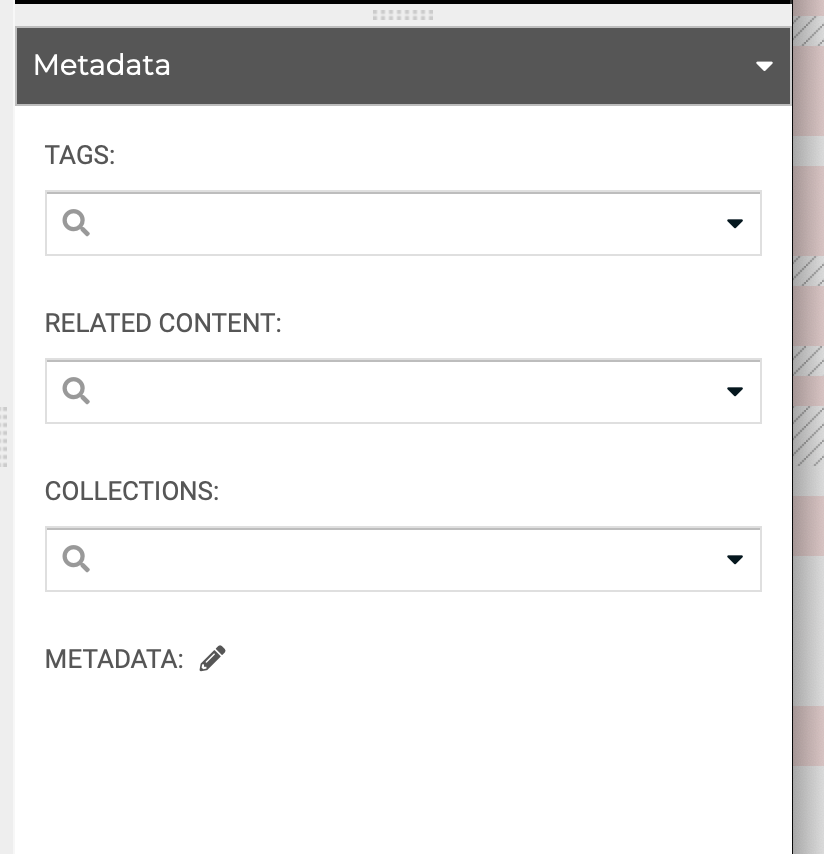
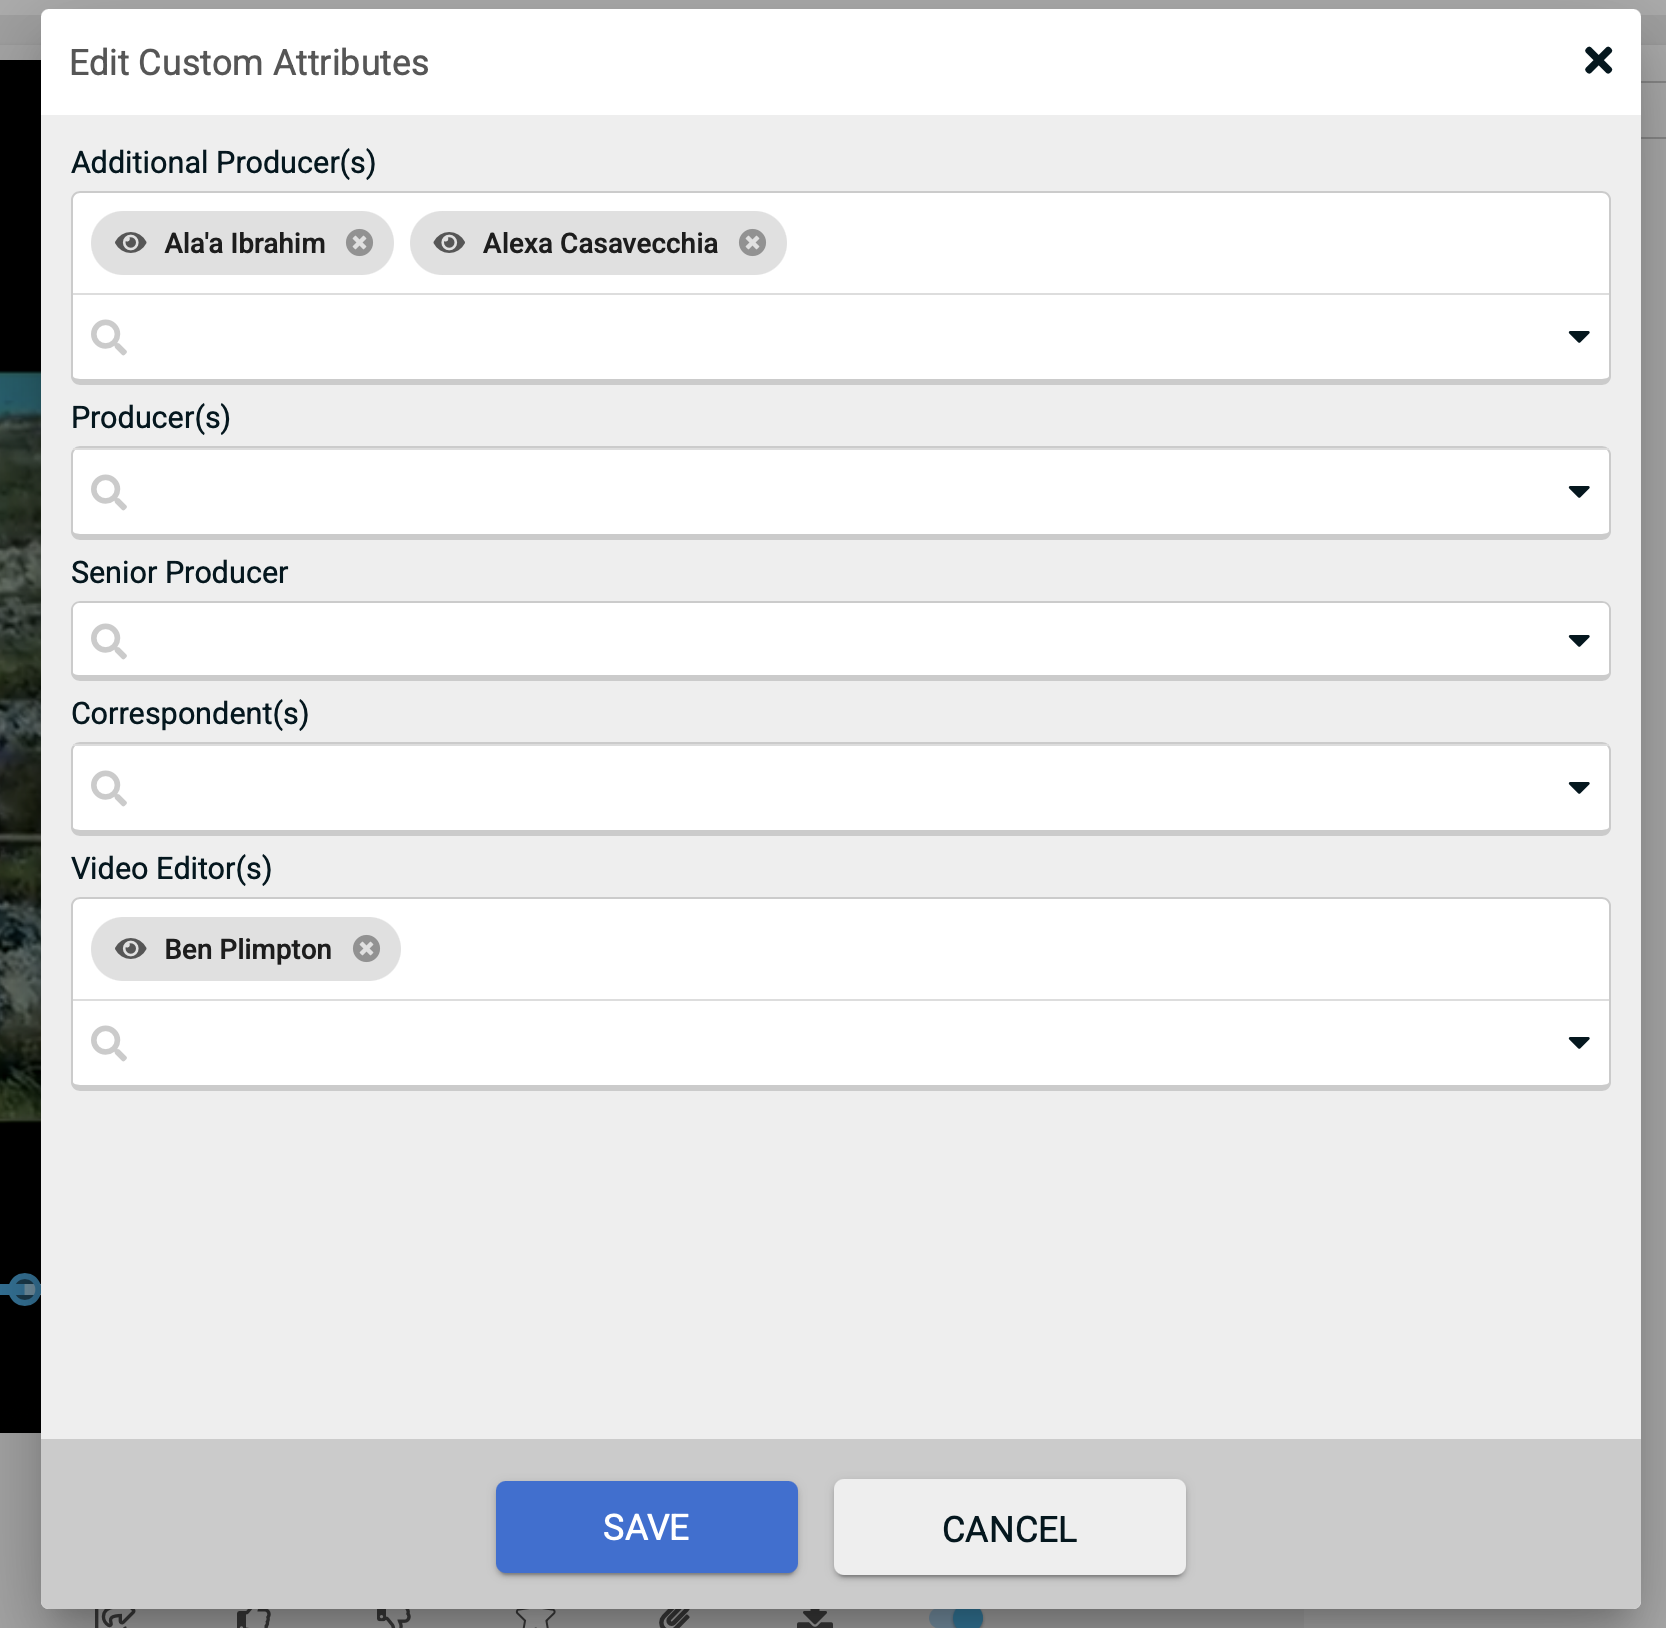
If you want to add/edit/delete custom metadata to the asset, click on the pencil button and new modal will popup. Something like this will show up.

After saving your changes the resulting view under Metadata may look something like this:

Viewing Custom Asset Metadata in Content Portal
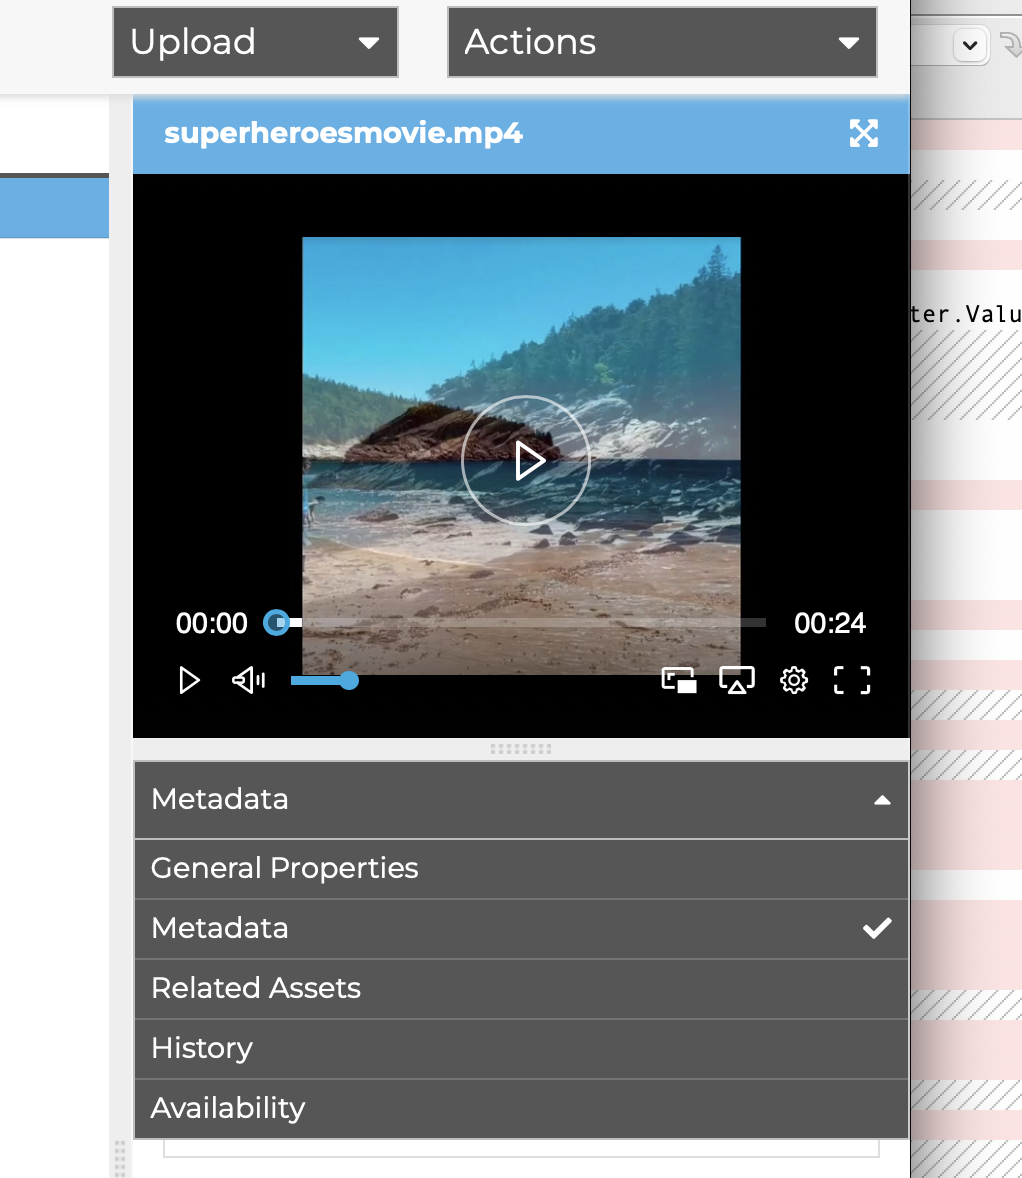
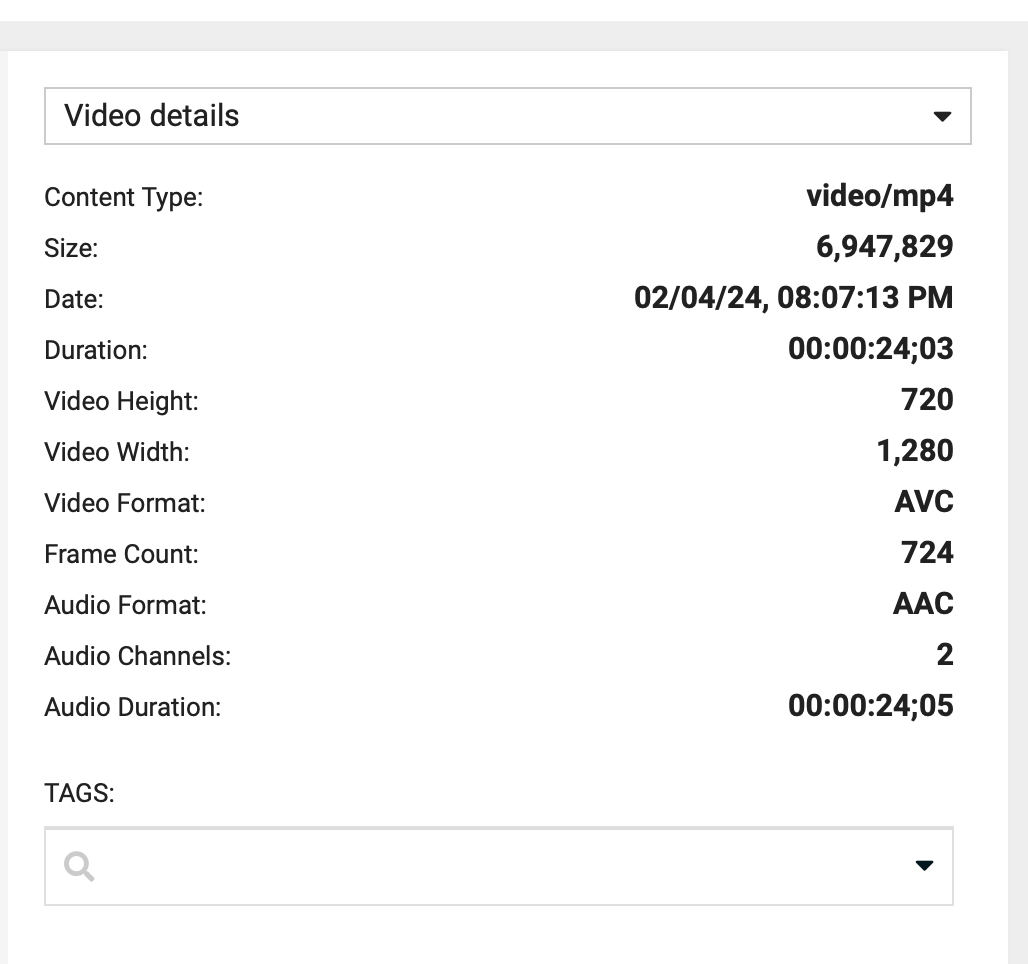
The out of box install will not show any custom asset metadata in the Content Portal video details panel. Example of this is below.
In order for us to see the custom asset metadata in the content portal we need to make some additional configuration changes to the portal.json file.
This is the standard asset properties configuration from our portal.json file. If you want to learn more, please follow this link to learn more about the portal.json configuration file.
"assetProperties": [
{
"title": "Content Type",
"property": "contentType",
"order": 1,
"type": "string"
},
{
"title": "Size",
"property": "contentLength",
"order": 2,
"type": "number"
},
{
"title": "Date",
"property": "createdDate",
"order": 3,
"type": "dateTime"
},
{
"title": "Language",
"property": "language.translatedTitle",
"order": 4,
"type": "string"
},
{
"title": "Duration",
"property": "videoDuration",
"order": 5,
"type": "string"
},
{
"title": "Video Height",
"property": "videoHeight",
"order": 6,
"type": "number"
},
{
"title": "Video Width",
"property": "videoWidth",
"order": 7,
"type": "number"
},
{
"title": "Video Format",
"property": "videoFormat",
"order": 8,
"type": "text"
},
{
"title": "Video Codec",
"property": "videoCodec",
"order": 9,
"type": "text"
},
{
"title": "Video Codec ID",
"property": "videoCodecId",
"order": 10,
"type": "text"
},
{
"title": "Frame Count",
"property": "videoFrameCount",
"order": 11,
"type": "number"
},
{
"title": "Audio Format",
"property": "audioFormat",
"order": 12,
"type": "text"
},
{
"title": "Audio Channels",
"property": "audioChannels",
"order": 13,
"type": "number"
},
{
"title": "Audio Duration",
"property": "audioDuration",
"order": 14,
"type": "text"
}
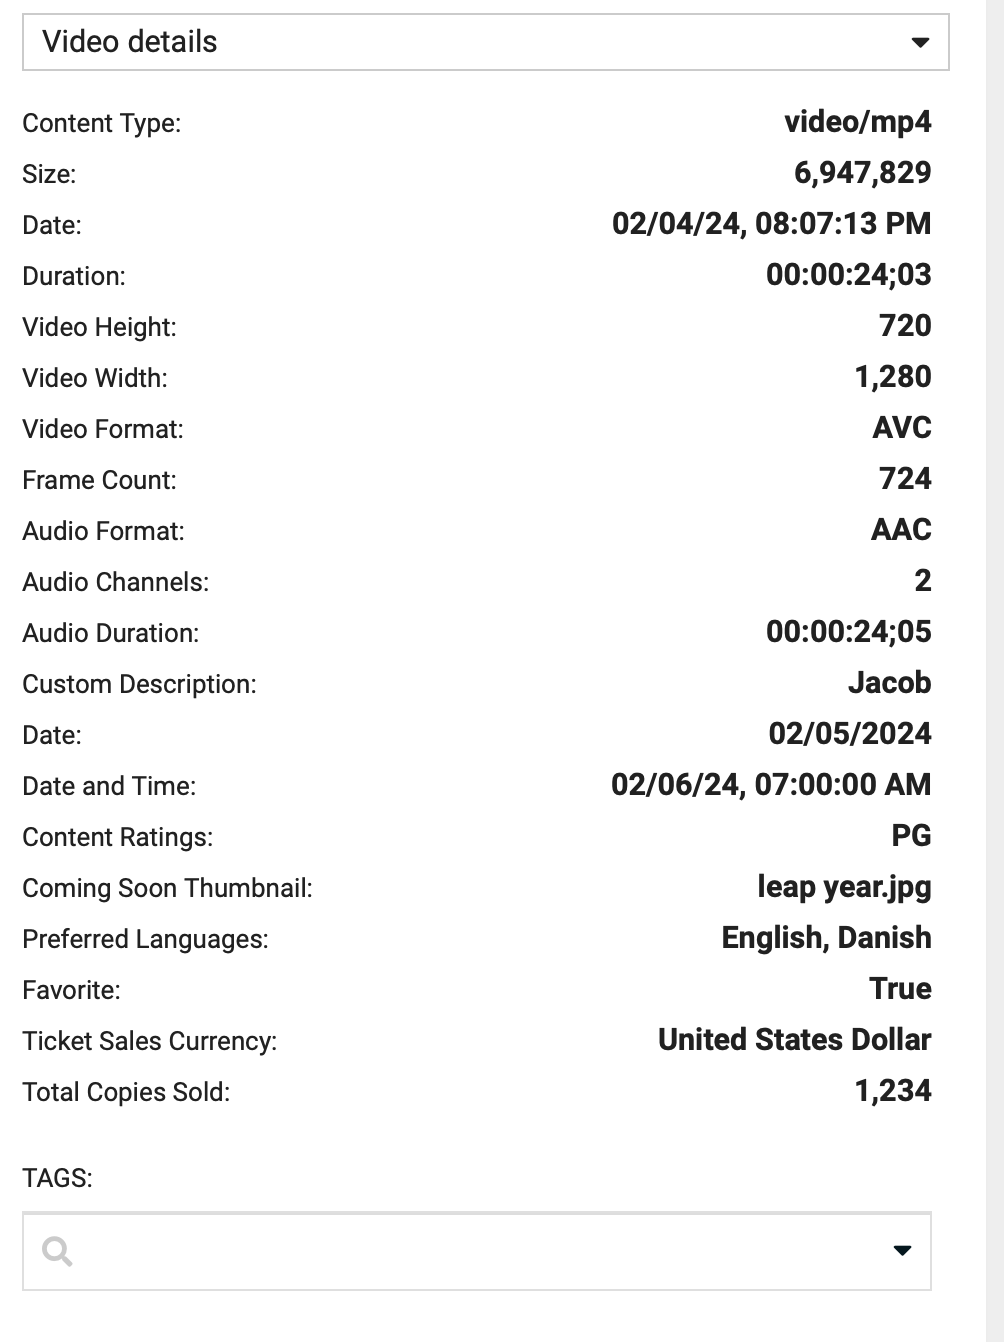
],Here are the configuration changes to add our custom metadata to the video details view. Note they start at order 15.
When you adding your custom asset metadata to the portal.json config the property name must match the content definition property name.
  "assetProperties": [
    {
      "title": "Content Type",
      "property": "contentType",
      "order": 1,
      "type": "string"
    },
    {
      "title": "Size",
      "property": "contentLength",
      "order": 2,
      "type": "number"
    },
    {
      "title": "Date",
      "property": "createdDate",
      "order": 3,
      "type": "dateTime"
    },
    {
      "title": "Language",
      "property": "language.translatedTitle",
      "order": 4,
      "type": "string"
    },
    {
      "title": "Duration",
      "property": "videoDuration",
      "order": 5,
      "type": "string"
    },
    {
      "title": "Video Height",
      "property": "videoHeight",
      "order": 6,
      "type": "number"
    },
    {
      "title": "Video Width",
      "property": "videoWidth",
      "order": 7,
      "type": "number"
    },
    {
      "title": "Video Format",
      "property": "videoFormat",
      "order": 8,
      "type": "text"
    },
    {
      "title": "Video Codec",
      "property": "videoCodec",
      "order": 9,
      "type": "text"
    },
    {
      "title": "Video Codec ID",
      "property": "videoCodecId",
      "order": 10,
      "type": "text"
    },
    {
      "title": "Frame Count",
      "property": "videoFrameCount",
      "order": 11,
      "type": "number"
    },
    {
      "title": "Audio Format",
      "property": "audioFormat",
      "order": 12,
      "type": "text"
    },
    {
      "title": "Audio Channels",
      "property": "audioChannels",
      "order": 13,
      "type": "number"
    },
    {
      "title": "Audio Duration",
      "property": "audioDuration",
      "order": 14,
      "type": "text"
    },
    {
      "title": "Custom Description",
      "property": "customDescription",
      "order": 15,
      "type": "text"
    },
    {
      "title": "Date",
      "property": "date",
      "order": 16,
      "type": "date"
    },
    {
      "title": "Date and Time",
      "property": "dateAndTime",
      "order": 17,
      "type": "dateTime"
    },
    {
      "title": "Content Ratings",
      "property": "contentRatings",
      "order": 18,
      "type": "lookup"
    },
    {
      "title": "Coming Soon Thumbnail",
      "property": "comingSoonThumbnail",
      "order": 19,
      "type": "lookup"
    },
    {
      "title": "Preferred Languages",
      "property": "preferredLanguages",
      "order": 20,
      "type": "multiselect"
    },
    {
      "title": "Favorite",
      "property": "favorite",
      "order": 21,
      "type": "boolean"
    },
    {
      "title": "Ticket Sales Currency",
      "property": "ticketSalesCurrency",
      "order": 22,
      "type": "relatedContent"
    },
    {
      "title": "Total Copies Sold",
      "property": "totalCopiesSold",
      "order": 23,
      "type": "number"
    }
  ],
Here is example output of previous example with adding our custom metadata properties. Starting at Custom Description property. You can order these as you want with the order asset properties.
Example of all supporting asset property types
Supported types are: string/text, number, boolean, date, dateTime, lookup, multiselect and relatedContent.
  "assetProperties": [
    {
      "title": "Content Type",
      "property": "contentType",
      "order": 1,
      "type": "string"
    },
    {
      "title": "Size",
      "property": "contentLength",
      "order": 2,
      "type": "number"
    },
    {
      "title": "Date",
      "property": "createdDate",
      "order": 3,
      "type": "date"
    },
    {
      "title": "Last Updated Date",
      "property": "updatedDate",
      "order": 4,
      "type": "dateTime"
    },
    {
      "title": "Video Format",
      "property": "videoFormat",
      "order": 5,
      "type": "text"
    },
    {
      "title": "Content Ratings",
      "property": "contentRatings",
      "order": 6,
      "type": "lookup"
    },
    {
      "title": "Preferred Languages",
      "property": "preferredLanguages",
      "order": 7,
      "type": "multiselect"
    },
    {
      "title": "Favorite",
      "property": "favorite",
      "order": 8,
      "type": "boolean"
    },
    {
      "title": "Ticket Sales Currency",
      "property": "ticketSalesCurrency",
      "order": 9,
      "type": "relatedContent"
    }
  ],
Setup Custom Property Panels
If you do not want to dump all your custom asset metadata fields under the video details panel you can configure custom panels and split up your properties. Here is example oh how that may look.
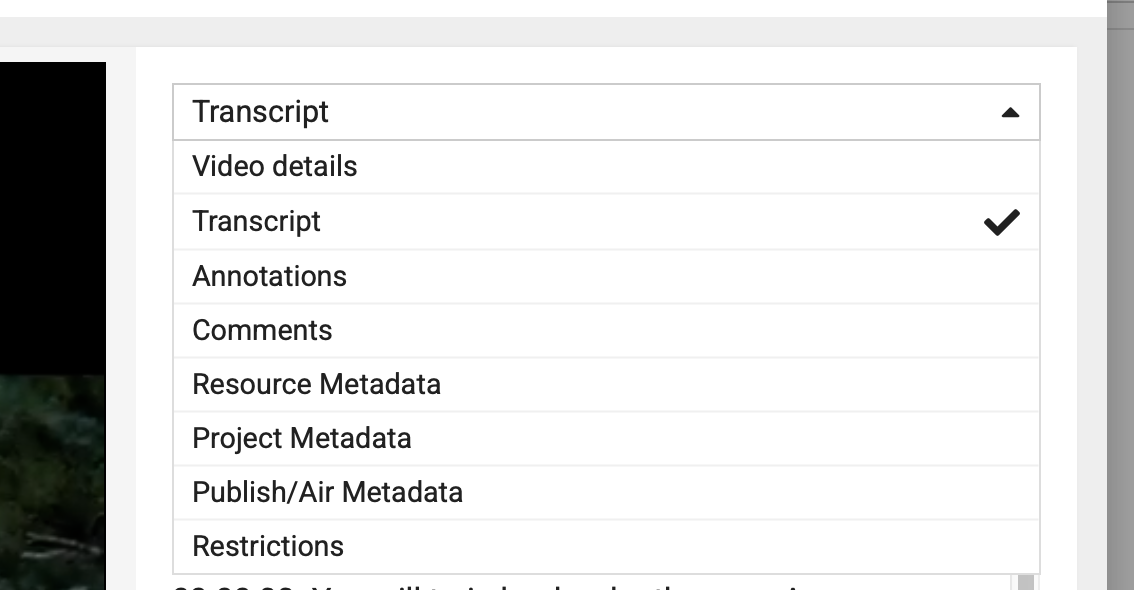

Note if the user has proper permissions they also will see the edit button. Each panel's properties can be edited and saved. Here is an example of this.
To setup this config here is what is required in the portal.json file.
"propertyPages": [
  {
    "title": "Resource Metadata",
    "name": "resourceMetadata",
    "order": 1
  },
  {
    "title": "Project Metadata",
    "name": "projectMetadata",
    "order": 2
  },
  {
    "title": "Publish/Air Metadata",
    "name": "publishAirMetadata",
    "order": 3
  },
  {
    "title": "Restrictions",
    "name": "restrictions",
    "order": 4
  }
],
"propertyPaneHeader": "mediaTypeDisplay",
Now to configure the individual properties you would go about this way. Assigning the asset custom metadata property to the appropriate propertyPageName.
"assetProperties": [
  {
    "title": "Additional Producer(s)",
    "property": "additionalProducers",
    "order": 100,
    "type": "multiselect",
    "propertyPageName": "resourceMetadata"
  },
  {
    "title": "Producer(s)",
    "property": "producers",
    "order": 101,
    "type": "multiselect",
    "propertyPageName": "resourceMetadata"
  },
  {
    "title": "Senior Producer",
    "property": "seniorProducer",
    "order": 102,
    "type": "relatedContent",
    "propertyPageName": "resourceMetadata"
  },
  {
    "title": "Correspondent(s)",
    "property": "correspondents",
    "order": 103,
    "type": "multiselect",
    "propertyPageName": "resourceMetadata"
  },
  {
    "title": "Video Editor(s)",
    "property": "videoEditors",
    "order": 104,
    "type": "multiselect",
    "propertyPageName": "resourceMetadata"
  },
],
The Nomad Media Public Sites cloudfront CDN distribution will need to be invalidated first. Next the portal entry point lambda cache this value and they will need to cold start again to retrieve the update config change.
Troubleshooting/Tips
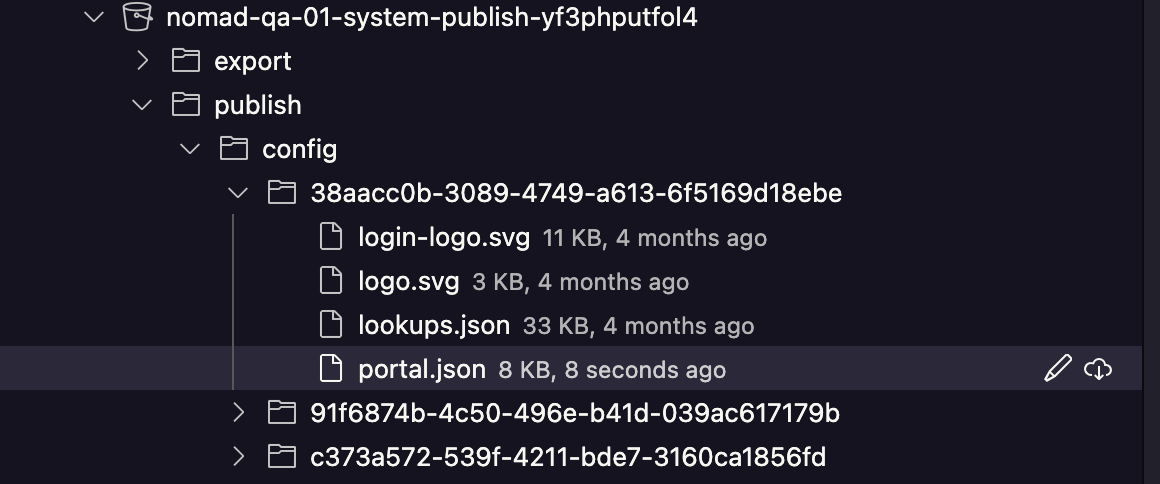
The location of the portal.json file is typically located in a similar location as this: